|
I. The purpose of this document
The course CSCI5234 requires you to complete its two projects. However, to have
better understanding about how they work in the real environment, DCSL provides
you the two servers (Web server and Database server) to install your project
applications. This set of instructions will guide you how to install your Web
project applications on DCSL servers.
II. Who should read these instructions
Students who take the course CSCI5234 - Web Security offered by Dr. T.
Andrew Yang
III. How to install
Note:
The following assumptions are made:
You have connection to the Web server
with IP address 192.168.7.10 and Database server with IP address
192.168.6.16 through VPN connection or DCSL Lab wireless connection or from
the computers in D158.
To know how to connect to the DCSL Lab
using wireless connection, refer to:
http://www.dcsl-uhcl.net/public/DCSL Wireless.html
To know how to connect to the DCSL Lab
using VPN connection, refer to:
http://www.dcsl-uhcl.net/public/DCSL vpn.html
Note: If you connect to DCSL Lab using
the Internet connection from a corporate LAN, please ask the administrator
if any policies preventing the VPN connection. For example, the VPN
connection to DCSL Lab does not work if you use the Internet connection from
the school PCLAB.
To test the connection, please using the
following Windows command in the command prompt:
Microsoft Windows XP
[Version 5.1.2600]
(C) Copyright 1985-2001 Microsoft Corp.
C:\Documents and Settings\Administrator>ping 192.168.7.10
Pinging 192.168.7.10 with 32 bytes of data:
Reply from 192.168.7.10: bytes=32 time=5ms TTL=128
Reply from 192.168.7.10: bytes=32 time=4ms TTL=128
Reply from 192.168.7.10: bytes=32 time=4ms TTL=128
Reply from 192.168.7.10: bytes=32 time=5ms TTL=128
Ping statistics for 192.168.7.10:
Packets: Sent = 4, Received = 4, Lost = 0 (0% loss),
Approximate round trip times in milli-seconds:
Minimum = 4ms, Maximum = 5ms, Average = 4ms
C:\Documents and Settings\Administrator>ping 192.168.6.16
Pinging 192.168.6.16 with 32 bytes of data:
Reply from 192.168.6.16: bytes=32 time=4ms TTL=128
Reply from 192.168.6.16: bytes=32 time=1ms TTL=128
Reply from 192.168.6.16: bytes=32 time=3ms TTL=128
Reply from 192.168.6.16: bytes=32 time=3ms TTL=128
Ping statistics for 192.168.6.16:
Packets: Sent = 4, Received = 4, Lost = 0 (0% loss),
Approximate round trip times in milli-seconds:
Minimum = 1ms, Maximum = 4ms, Average = 2mspi
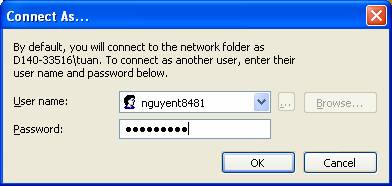
Your are
created three accounts including: VPN account, Web server account and Database
server account. Your three accounts are created with the same username and
password, which help you easy to remember your username. If you change the
password, please remember your password for each account. However, you can
change to the same password for all three accounts.
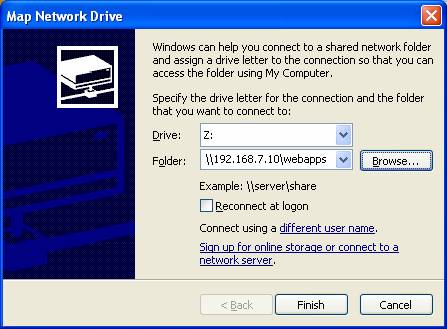
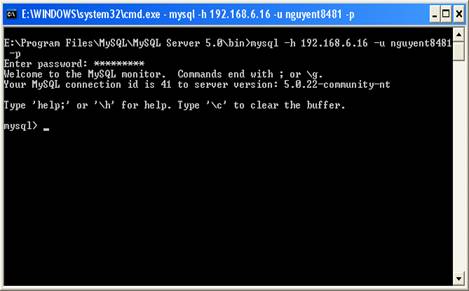
In the Web Security projects, after
connecting to the DCSL system through VPN connection, you will work with the
two servers, which are the Web server with IP address 192.168.7.10 and Database
server with IP address 192.168.6.16. The following will guide you how to copy
your source code into Web server, create database in database server and test
your web application.
|