ObjectStore Rapid Database Development for Java
Chapter 2
Design the Database
This chapter shows you how to use the Database Designer to define a database for a simple personnel application.
This chapter covers the following topics:
Starting the Database Designer
When you start the Database Designer, you need to specify the type of schema you want to design. To start the Database Designer, double-click the Database Designer icon located in the ObjectStore program group that was created when you installed ObjectStore.

You can also launch the Database Designer from the Windows
 menu. Click Programs | ObjectStore Database Designer | ObjectStore Database Designer.
Open a workspace
To open a new database design file, or workspace, click the New button on the Database Designer toolbar.

The Database Designer opens an unnamed, empty workspace where the classes, fields, methods, and relationships that represent the schema of your database are stored.
Save the empty workspace
Click the Save button
 to save the database design file with the name personnel. By default, this file is saved to the odi\PSEProJ\OSDD\bin directory with the .dbs extension (for database schema).
Creating Classes and Fields
After you open a new workspace, you can create the classes and fields that will become the foundation of your personnel database.
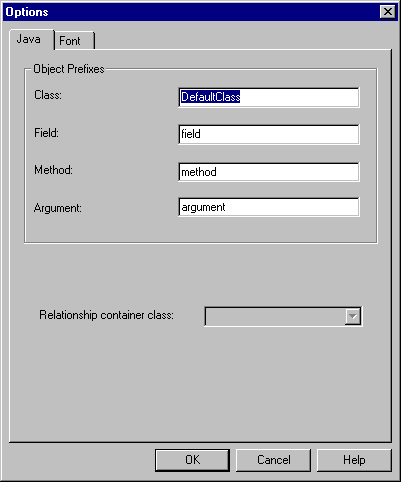
Check default names
The Database Designer uses default prefixes for class and field names. You can use these default values to quickly sketch a design and then fill in the details later.
To open the Options dialog box and view the default values, click Tools | Options.
Create a Person class
Use the Class dialog box to create and edit classes, and to define methods and relationships.
To create a class called Person:

- Click the Class button on the Database Designer toolbar, or click Class | Add on the menu bar to open the Class dialog box.
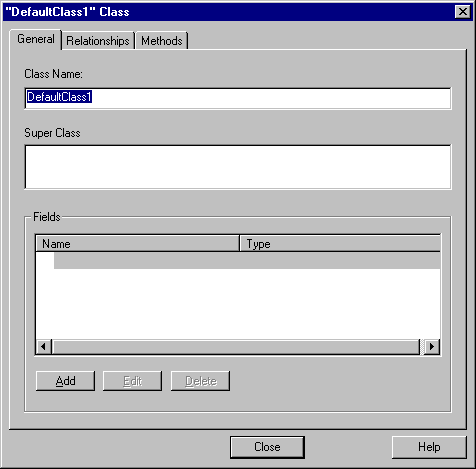
- In the General property sheet, change the default value in the Class Name field from DefaultClass1 to Person.
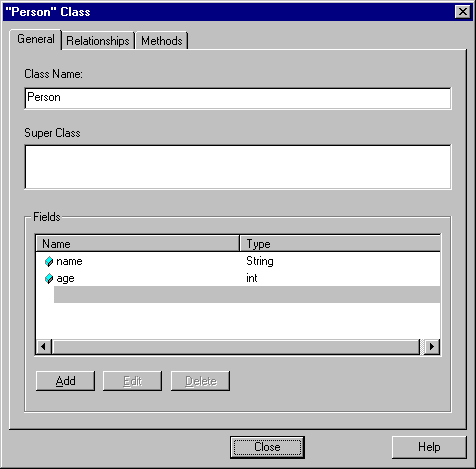
Add Name and Age fields
- Add the following fields to the Person class. Each field uses a primitive data type, therefore you can add your field information directly in the Class dialog box:
You can also add fields to your classes at a later time.
- Click a row in the Name column of the Fields list box and then type the field name.
- Click a row in the Type column to display a list of primitive data types.
Tip: You can access Java, ObjectStore, and user-defined types from the Field Relationship dialog box. To display this dialog box, click the ellipsis entry (...) in the Type drop-down list, or click the Add button.
- Select the type and press Enter to define the field.
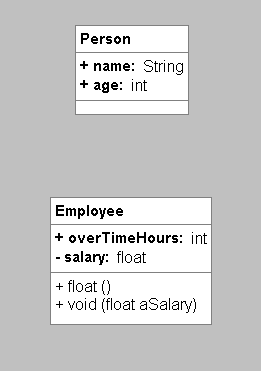
Create an Employee class
Create an Employee class using the same procedure you used to create the Person class. Then define the following two fields:
Note: To make the salary field private, click the Private option button located in the Access group box of the corresponding Relationship dialog box.
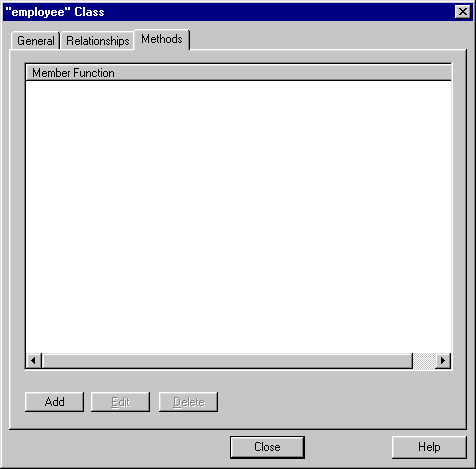
Creating Accessor Methods
After you create classes, you can create accessor methods for each class. This example creates accessor methods for the Employee class. These methods will return and set the value of the salary field.
The get method
To create a method that returns the value of the salary field:
- Click the Methods tab of the Class dialog box.
- Click the Add button.
The Class: Method dialog box opens.
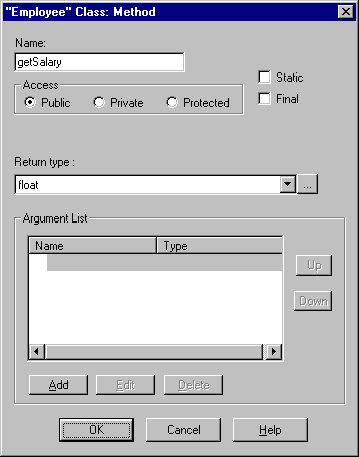
- Type getSalary in the Name field.
- Select float from the Return type list and then click OK.
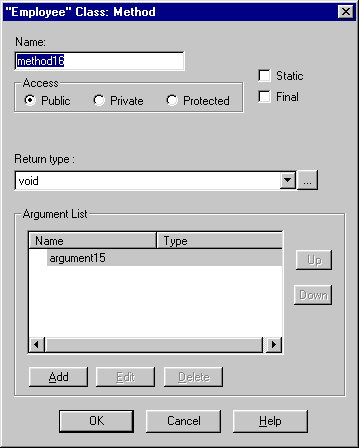
The set method
To create a method to set the value of the salary field:
- Click the Add button on the Methods tab of the Class dialog box.
The Class: Method dialog box opens.
- Type setSalary in the Name field.
- Select void from the Return type list box.
- Click the Name field in the Argument list box to display the default argument name.
- Change the default argument name by typing Salary in the Name field.
- Select float from the Return type list and then click OK.
The next section shows you how to use the database diagram to create a relationship between the Person class and the Employee class, and then create a method for the Employee class.
Creating Relationships
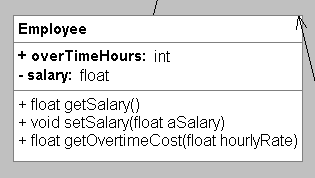
You now have two classes defined for your personnel database, the Person class and the Employee class. In this section, you will create an inheritance relationship between these two classes using a database diagram. The following database diagram shows the contents of these two classes.
Create an Inheritance Relationship
An inheritance relationship consists of a superclass and a subclass; the subclass inherits attributes from the superclass. Inheritance relationships are sometimes called is-a relationships, as in, an Employee is a Person.
To create an inheritance relationship between the Employee and Person classes:
- Click the Inheritance button
 on the Database Designer toolbar.
- Press and hold the Shift key.
- Click and drag the mouse pointer from the Employee class (the subclass) to the Person class (the superclass), and then release the mouse button.
Note that when you define an inheritance relationship graphically, you must always identify the subclass first.
Tip: You can drag a class anywhere within the database diagram.
When the relationship is created, a line that connects the two classes appears in the diagram.
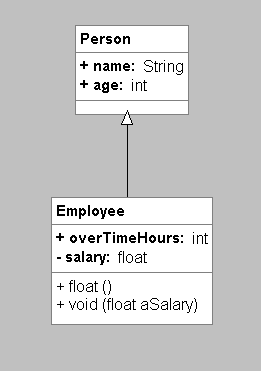
Note: This example uses UML notation, which uses an arrow symbol at the end of the line to identify the inheritance relationship. OMT notation uses a triangle symbol instead of an arrow.
You can also create a relationship by selecting a class name in the diagram and then either
Enhancing the Design
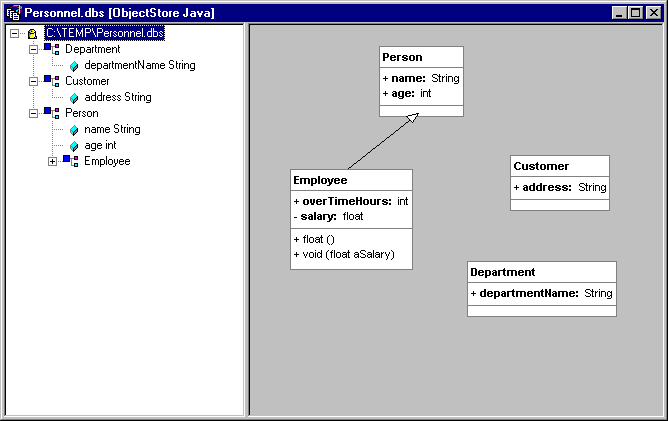
You now have defined an inheritance relationship between the Employee and Person classes in your personnel database design. In this section, you add more classes, relationships, and a method to make the design more complete.
Create Two Additional Classes
Add two classes, Customer and Department, to your database design. The field name and type for each class are defined in the following table
:
After you add these classes, your database diagram will look similar to the following diagram:
Tip: To get started, click the Class button on the toolbar, or select Add from the Class menu. If you need more help, see Create a Person class.
Create Two Additional Relationships
Inheritance
Now add an inheritance relationship between the Customer and Person classes. Click the Inheritance button on the Database Designer toolbar, press and hold the Shift key, and then drag the mouse pointer from the Customer class to the Person class. (See page 20 if you need more specific instruction.)
One-way
Next, create a one-way relationship between the Department and Employee classes. Although you can create any relationship graphically, some relationships require you to provide additional information before the relationship can be created.
To create a one-way relationship between the Department class and the Employee class:
- Click the One-way button
 on the toolbar.
- Press and hold the Shift key.
- Click and drag the mouse pointer from the Department class to the Employee class, and then release the mouse button.
The One-way Relationship dialog box appears.
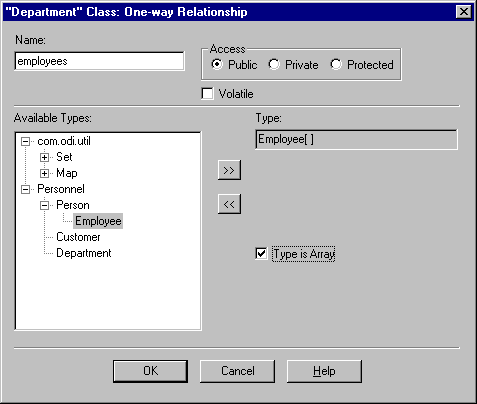
- Click in the Name field and then change the default field name to employees.
- In the Available Types box, double-click on Employees.
- Click the Type is Array check box.
- Click OK.
This defines a one-to-many relationship between Department and Employee; in other words, a department contains zero to many employees. In this example, the relationship is implemented using a Java array.
You can also create a relationship by selecting a class name in the diagram and then either
Create an Additional Method for Employee
Now you create another method for the Employee class. Consider that the end user of your personnel application will need to determine the amount of overtime costs generated by a particular employee.
You need to add a method declaration to the Employee class in your database design and then write a simple method definition using Visual J++ or another code editor.
To create a method for Employee:
- Double-click the Employee class name in the database diagram to open the Class dialog box.
- Click the Methods tab to display the Methods property sheet.
- Click the Add button to open the Class: Method dialog box.
- Click the Name field and type the name getOvertimeCost.
- Select float from the Return Type list.
- Click the Name field in the Argument list box and change the default argument name to hourlyRate.
- Select float from the Type drop-down list and then click OK.

The new method appears on the Methods property sheet, and also appears in the Employee class in the database diagram.
- Click Close to close the Class dialog box.
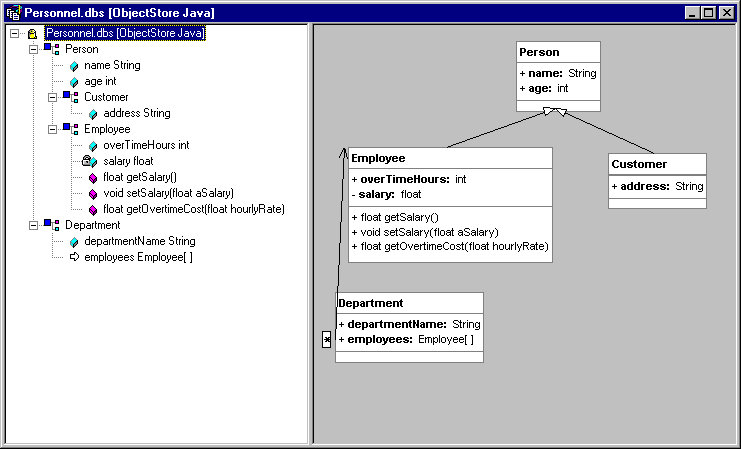
Reviewing the Completed Database Design
The completed design diagram for the personnel database should include all the classes, fields, and relationships shown in the following figure. Note that the placement of individual classes might vary - you can arrange the classes in a database diagram according to your preferences.
Save the Database Design
When you are satisfied that your design is correct, save the design file. This file is used as input to the ObjectStore Component Wizard, which is described in the following chapter.
[previous] [next]
Copyright © 1998 Object Design, Inc. All rights
reserved.
Updated: 10/06/98 15:41:33
 on the toolbar.
 on the toolbar.