
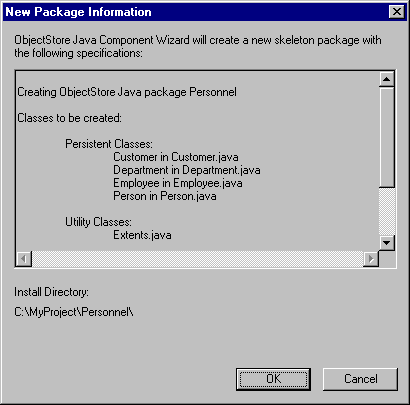
This chapter shows you how to use the Component Wizard to generate the code you will use to implement your application. Using the personnel database design file you created in Chapter 2 as input, you can select a number of code-generation options and let the Component Wizard do the rest.
This chapter covers the following topics:
After you start the Component Wizard, the ObjectStore Component Wizard for Java Step 1 of 2 dialog box opens.

Every dialog box of the Component Wizard has a Next and a Finish button. Both buttons advance the Component Wizard.
If you are running the Component Wizard from the Database Designer, the active database will be used. Then you need to select the classes that you want to use in your application.
Click Next to continue to the next step, as described in Defining Database Entry Points.
Tip: After you become more familiar with the Component Wizard, you can click the Finish button whenever it is available.
Defining Database Entry Points
Now you need to define the entry points, called roots, of your database. A database root gives an object a persistent name, which allows the object to serve as an entry point into persistent memory. When an object has a persistent name, any process can look it up by that name and retrieve it; you can find related objects by navigating from object to object.

Create Roots for Top-Level Classes
A database root can be any type of object or collection of objects. By default the Component Wizard creates a root for each top-level class in a schema that points to one of the collection types for ObjectStore. These types include OSTreeSet and OSVector. The Component Wizard uses OSTreeSet by default. For each of the selected classes, the Component Wizard generates the code to create the root, create the container, and update the class extent, that is, all the persistent instances of the class. For more information
To learn more about roots, entry-point objects, and collections, see the ObjectStoreJava API User Guide. Define Database Roots
The Component Wizard displays the default values that will be used to define the database roots for your application.
You are now ready to build an application.
The following is an excerpt from the Employee.java file:
public class Employee extends Person{
// Attributes
      public int overTimeHours;
      private float salary;


// Operations
      public  float getSalary()
      {
            float ret=0;
            //TODO: Add your code here
            return ret;
      }
      public  void setSalary(float aSalary)
      {
            //TODO: Add your code here
      }
      public  float getOvertimeCost(float hourlyRate)
      {
            float ret=0;
            //TODO: Add your code here
            return ret;
      }


}
You need to provide the method body for each method you define in the Database Designer. See Defining Methods for more information on writing methods.
Class Constructor
For each class, the Component Wizard generates an empty constructor with no parameter, and a constructor that initializes all the attributes to the values passed as parameters to the constructor.
public class Person{


      ////////////////////////////////////////////////////////
      // Constructor
      public Person()
      {
      }

      public Person(String _name, int _age)
      {
            name=_name;
            age=_age;
      }

}
//Extents
      public static Ext_OSTreeSet Ext = new Ext_OSTreeSet("Person");
The Ext attribute points to the extent for the class that is implemented as
Ext_OSTreeSetThe Component Wizard also generates the following method:
public void preFlushContents()
      {
            Segment theSegment=
Session.getCurrent().segmentOfpreFlushContentsObject();
            Database db = theSegment.getDatabase();
            Collection theExtent = (Collection) Ext.getExtents(db);
            if (!theExtent.contains(this))
                  updateExtents(db, true);
}
The preFlushContents method is called when the instance changes its persistent state. The previous implementation of the preFlushContents method ensures that when the instance becomes persistent because it has been included or referred to by another persistent object, it gets inserted into the proper extent.The following generated method explicitly inserts an instance into its extent:
void updateExtents(Database db, boolean add)
      {
            Ext.update(this, db, add);
}
This method should be called after an instance has been created to insert it into the proper extent. When inserted into a persistent extent, the newly created instance becomes persistent itself.
An extent is a collection of all the instances of a class in the database and can be implemented using any container class. The Component Wizard allows you to implement extents using either an OSTreeSet or OSVector; that is why the Extents class is an abstract class that gets specialized by Ext_OSTreeSet and Ext_OSVector. These classes are the classes for which an extent-handling mechanism has been specified in the Component Wizard.
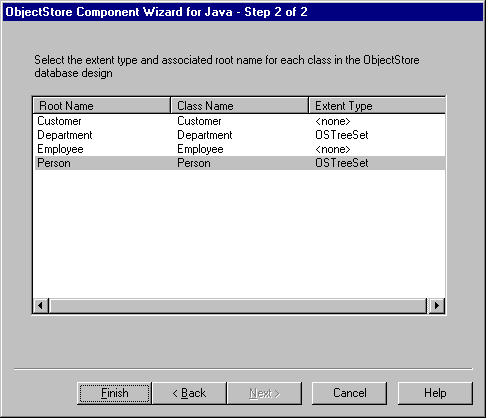
In the personnel database, you implemented the extent of the Department and Person classes using an OSTreeSet; therefore, the class Ext_OSTreeSet is used. By default, root names are based on class names.
public abstract class Extents
{
      String m_name;
      Database m_db=null;
      Object m_obj;
      Object m_root;

      public String getRootName() {return m_name;};

      public Extents(String rootname)
      {
            m_name = rootname;
      }

      public abstract Object createExtents(Database db);

      public Object getExtents(Database db)
      {
            try{
                  if (db!=null){
                        m_db      = db;
                        m_root      = m_db.getRoot(m_name);
                  }
            }
            catch(DatabaseRootNotFoundException RootNotFound){
                  m_root = null;
            }

            if (m_root==null){
                  m_root = createExtents(db);
                  setExtents(m_root);
            }

            return m_root;
      }

      public void update(Object obj, Database db)
      {
            m_obj      = obj;
            m_db      = db;
      }

      protected void setExtents(Object root)
      {
            m_root = root;
            m_db.createRoot(m_name, root);
      }

      protected boolean checkType(Object obj, String type)
      {
            Class c = obj.getClass();
            String name = c.getName();
            return (name.compareTo(type) == 0);
      }
}
public String getRootName() Returns the name of the root that points to the extent.public abstract Object createExtents(Database db); Implemented by the Ext_OSTreeSet and Ext_OSVector classes. It creates the proper container collection for the extent.
public Object getExtents(Database db) Returns the class extent. If the extent does not exist, it calls the createExtents method to create one and attaches it to the proper root.
public void update(Object obj, Database db) Inserts the obj object into the extent.
Consider the following example of the body of the getSalary method of the Employee class.
The Component Wizard generates the following code:
      public  float getSalary()
      {
            float ret=0;
            //TODO: Add your code here
            return ret;
      }
The getSalary method returns the value of the salary attribute. The method body might look like this:
public  float getSalary()
      {
            return salary;
      }
The setSalary method sets the value of the salary attribute. The method body might look like this:
public  void setSalary(float aSalary)
      {
            //TODO: Add your code here
            salary = aSalary;
      }
The getOvertimeCost method should return the product of the hourlyRate parameter and the number of overtime hours stored in the overTimeHours attribute:
      public  float getOvertimeCost(float hourlyRate)
      {
            float ret=0;
            //TODO: Add your code here
            ret= overTimeHours * hourlyRate;
            return ret;
      }
final public class Top
{
      public static Database db=null;

      public static void main(String argv[]) throws java.io.IOException
      {
            String dbName="db.odb";
            ObjectStore.initialize(null, null);

      try{
            try{
                  db = Database.open(dbName,  ObjectStore.OPEN_
UPDATE);
            }
            catch (DatabaseNotFoundException e){
                  db = Database.create(dbName,ObjectStore.ALL_READ |
ObjectStore.ALL_WRITE);
            }
            Transaction t = Transaction.begin(ObjectStore.UPDATE);

            //insert your code here


            t.commit();
            db.close();
      }
      catch(Exception e){
            System.out.println(e);
      }
      finally{
            ObjectStore.shutdown(true);
      }
  }
}
The db attribute points to a Database object:
public static Database db=null;The database gets opened in the main function:
try{
      db = Database.open(dbName,  ObjectStore.OPEN_UPDATE);
}
If it does not exist it is created:
catch (DatabaseNotFoundException e){
      db = Database.create(dbName,ObjectStore.ALL_READ |
ObjectStore.ALL_WRITE);
}
The main function also shows how you can start and commit a transaction:
Transaction t = Transaction.begin(ObjectStore.UPDATE);
//insert your code here
t.commit();
The main function of the Top class might contain the following:
Transaction t = Transaction.begin(ObjectStore.UPDATE);

//insert your code here
//Creating a Department instance
Department dep1 = new Department();
dep1.departmentName = "Marketing";
dep1.employees = new Employee[10];

//Adding dep1 to the extent of Departments
dep1.updateExtents(db, true);

t.commit();
This code creates a new Department instance and sets its name to Marketing.
The updateExtent call inserts the newly created Department into the proper extent. Given that the class extent is allocated persistently (it is reachable from a root), the dep1 object instance automatically becomes persistent.
Now add some Employees and attach them to Marketing:
//Creating some Employee instances
Employee e1= new Employee(10, 20000, "John", 33);
Employee e2= new Employee(25, 35000, "Peter", 40);

//Attaching the employees to the Department
dep1.employees[0]= e1;
dep1.employees[1]= e2;
When you attach e1 and e2 to the employees array, they become persistent by reachability because dep1 is a persistent object.
To complete the example, add another Department with some additional employees.
//Creating another Department instance
Department dep2 = new Department();
dep2.departmentName = "Sales";
dep2.employees = new Employee[10];

//Adding dep2 to the extent of Departments
dep2.updateExtents(db, true);

//Creating some Employee instances
Employee e3= new Employee(10, 50000, "Chris", 51);
Employee e4= new Employee(45, 38000, "Larry", 39);
Employee e5= new Employee(15, 35000, "Andy", 55);

//Attaching the employees to the Department
dep2.employees[0]= e3;
dep2.employees[1]= e4;
dep2.employees[2]= e5;
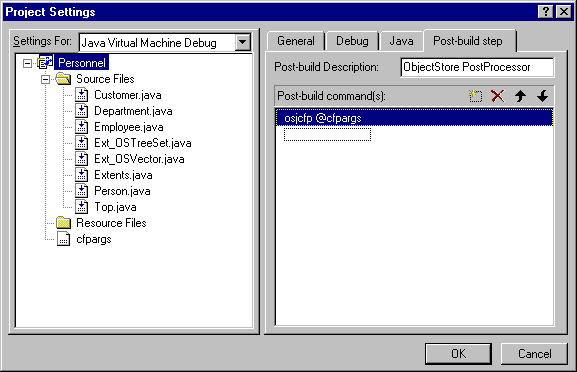
@echo off

ECHO Compiling source files
javac *.java

ECHO Running ObjectStore classfile postprocessor
call osjcfp @cfpargs

ECHO run the program
java Personnel.Top
The doall.bat assumes that you are using the javac command-line compiler and that it is in your bin path. If this is not the case, make the appropriate changes to doall.bat.
After all the Java files are compiled, doall.bat calls the postprocessor to process all the classes that are part of the schema you defined with the Database Designer.
-dest . -inplace
-persistaware
Top.class
Extents.class
Ext_OSTreeSet.class
Ext_OSVector.class
-persistcapable
Customer.class
Department.class
Employee.class
Person.class
If the compilation and postprocessing operations successfully complete, the java Personnel.TOP command executes your application.

The Component Wizard also sets the project so that at the end of the compilation process, the compiler calls the postprocessor.
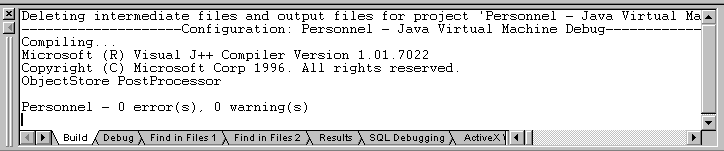
The following code is a sample of the output of the compilation process:
The first time you run the application, Visual J++ prompts you to enter the name of the class you want to execute. In this example, you enter Personnel.Top.
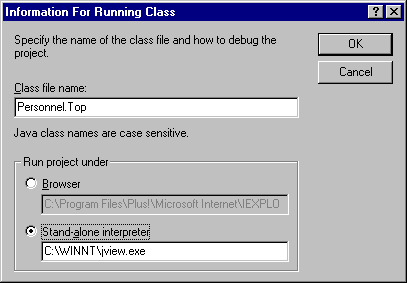
If Visual J++ displays
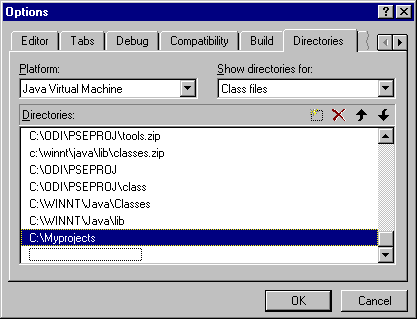
"ERROR: Could not execute Personnel.Top: The system cannot find the file specified", check that you added the proper class path to the list of class directories. For example, if you created your project under c:\Myprojects\Personnel, make sure the c:\Myprojects directory is included in the list of class directories:To add a directory to the Class path:
Updated: 10/06/98 15:51:13